

It's Coolio
By Daniel Samson, CO-AUTHORED-BY: CLAUDE OPUS 4.8 <NOREPLY@ANTHROPIC.COM> · 2026-06-06
My server rack runs hot. Not alarmingly so, but hot enough that I've been eyeing the airflow situation for a while. The obvious fix is more fans — but mounting them neatly inside a 19" rack isn't quite as simple as it sounds. So I did what any reasonable person does: opened up a CAD tool and started designing.
3D printing to the rescue.
The EIA-310 hole pattern problem
A 19" rack follows the EIA-310 standard. The pattern repeats every 1U (44.45 mm), and within each U there are three holes with deliberately asymmetric spacing. This trips people up constantly. If you assume uniform spacing and design a bracket with two mounting tabs, there's a good chance the second tab won't line up with any hole.
 |  |
My rack uses M6 cage nuts. The rails have holes on both the sides and the front, which gives me options. With the right bracket design and standard hardware, I should be able to bolt a fan assembly directly to the existing rails without drilling anything.
The design
I went modular. It simplifies the build and keeps costs down — if one component changes, you reprint that part rather than the whole assembly.
The design is made up of three main pieces: an M6 bracket that bolts to the rack rails, a 2020 aluminium extrusion spine (20 mm × 20 mm cross-section, 267 mm length) that connects to the bracket via M5 T-nuts, and two 120 mm fan carrier plates that hang off the extrusion spine. The extrusion spine is the bit you'd cut to a custom length depending on how many Us you're working with.
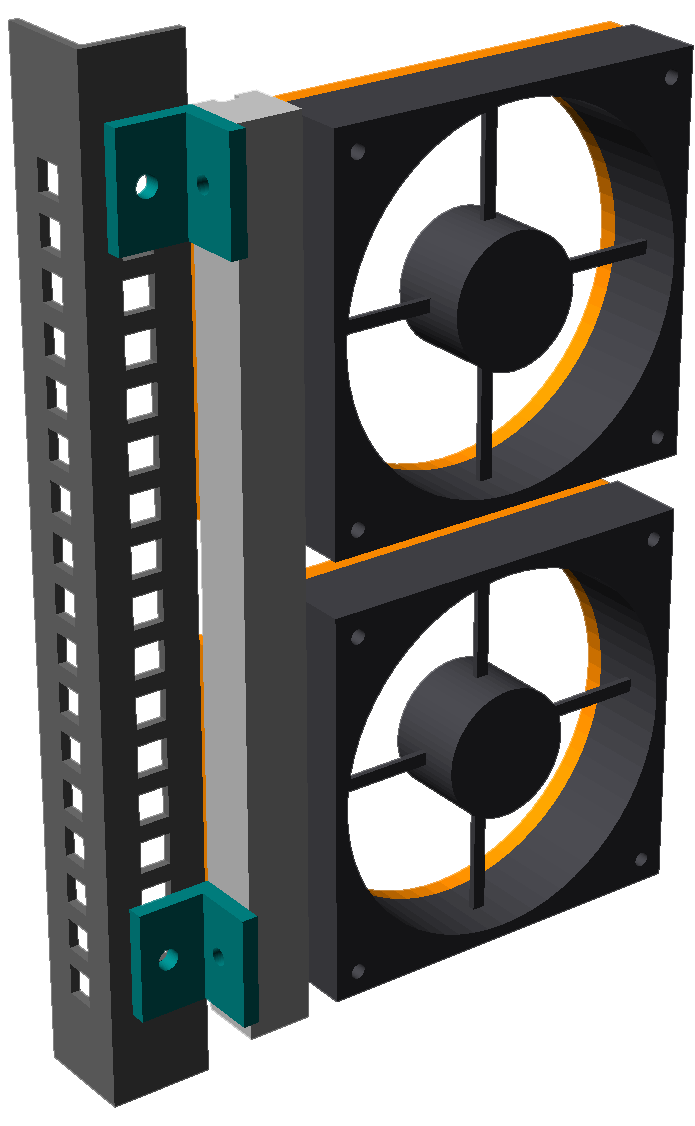 |  |
The two visualisations above show the front and back of the full assembly. It's fairly compact — two 120 mm fans sit in a 6U height budget, which gives decent airflow without dominating the rack.
Buzzing
A fan rotor is never perfectly balanced, so as it spins it throws off a small periodic force — at its rotation frequency and at the blade-pass harmonics above that. That energy has to go somewhere. It becomes a problem in two ways.
One is resonance: every structure has a natural frequency it "likes" to vibrate at, and if your bracket's happens to line up with the fan's spin frequency, the vibration amplifies instead of damping out, and you get an audible drone or rattle. The other is plain transmission: even without resonance, the vibration travels through the bracket into the rack frame, which is a big stiff sheet of metal that radiates it as sound like a speaker cone.
The solution: anti-vibration washers. Cheap, simple, and they break the mechanical path between the fan and the printed carrier. Worth the extra few minutes of assembly.
Choosing the material
Not every filament is appropriate here. A rack can get warm, the parts are bolted under load, and I'd rather not come back in six months to find something has sagged. Here's how I'm thinking about the options:
PLA — avoid. Its glass transition is only ~55–60°C, so in a warm, enclosed rack on a hot day a bolted or cantilevered PLA part can slowly sag or creep under load. It's the cheapest and easiest to print, but it's the wrong tool here. Fine for a throwaway test print, not the real parts.
PETG — the pragmatic default. Glass transition around 75–80°C, tougher and less brittle than PLA, handles bolted joints and vibration well, cheap, and easy for any FDM fab. For the flat carriers especially, this is the sweet spot.
ASA (or ABS) — the step up for the brackets. Better heat resistance (~95–100°C) and very good for bolted structural parts; ASA also handles UV if anything's exposed. Slightly fussier to print, but a fab handles that. Worth it for the load-bearing brackets if you want extra margin.
PA12 nylon via SLS/MJF — the production option. This is what I'd pick if your fab quotes it reasonably: no support marks, near-isotropic strength (so the cantilever load isn't fighting weak layer lines), excellent heat behaviour, and a clean finished look. Pricier than FDM but not wildly so at four-off, and it sidesteps FDM's weakest-between-layers problem entirely.
My current leaning: PETG for the fan carriers, ASA for the brackets — or spring for PA12 MJF across the board if the quote is reasonable. I'll update this post once I've got prices back.
Project Files
I used OpenScad to achieve this, if you want to use my design, it's on GitHub.
What's left
The mechanical design is largely done. Two things still to sort before this project is finished:
Pricing up the cost to print the parts.
Designing how to control the fan speed.
Fan speed control in particular deserves its own post. Running fans at full tilt defeats the point — I want them to ramp up with temperature and stay quiet when the rack is idle. More on that once I've worked it out.